SIGN ES Integration Guide for New Customers
This guide helps you to successfully integrate the fiskaly SIGN ES API and describes all the necessary steps you and your merchants need to take.
Setup - Creating organizations
By default, you will start in the TEST environment, where you can test different scenarios. In order to go live please contact our Sales Team who will enable the LIVE environment for your first organization.
Resources created in the TEST environment will not be transferred to the LIVE environment.
Once you have at least one LIVE organization, you can switch other organizations to LIVE environment without contacting our Sales Team. The TEST environment remains available even after enabling the LIVE environment.
New customers: create an account
In order to test the fiskaly services, you will need an account. So first, create an account via the fiskaly Dashboard.
Then you will be prompted to create your first main organization.
Note: please do not forget to add your billing address. The billing address entered here will only be used for fiskaly's billing purposes.
Main and managed organizations: differences
A main organization (organization) represents a POS provider or a retailer with its own POS system, while a managed organization (managed_organization) represents a merchant.
Examples:
- If the main organization is a POS provider, the managed organizations represent each merchant (taxpayer) with their VAT number and fiscal territory.
Note: The relevant fiscal territory is determined based on the legal address, the one the company is registered at, not the physical location of a store, for example.
Creating the first API Key
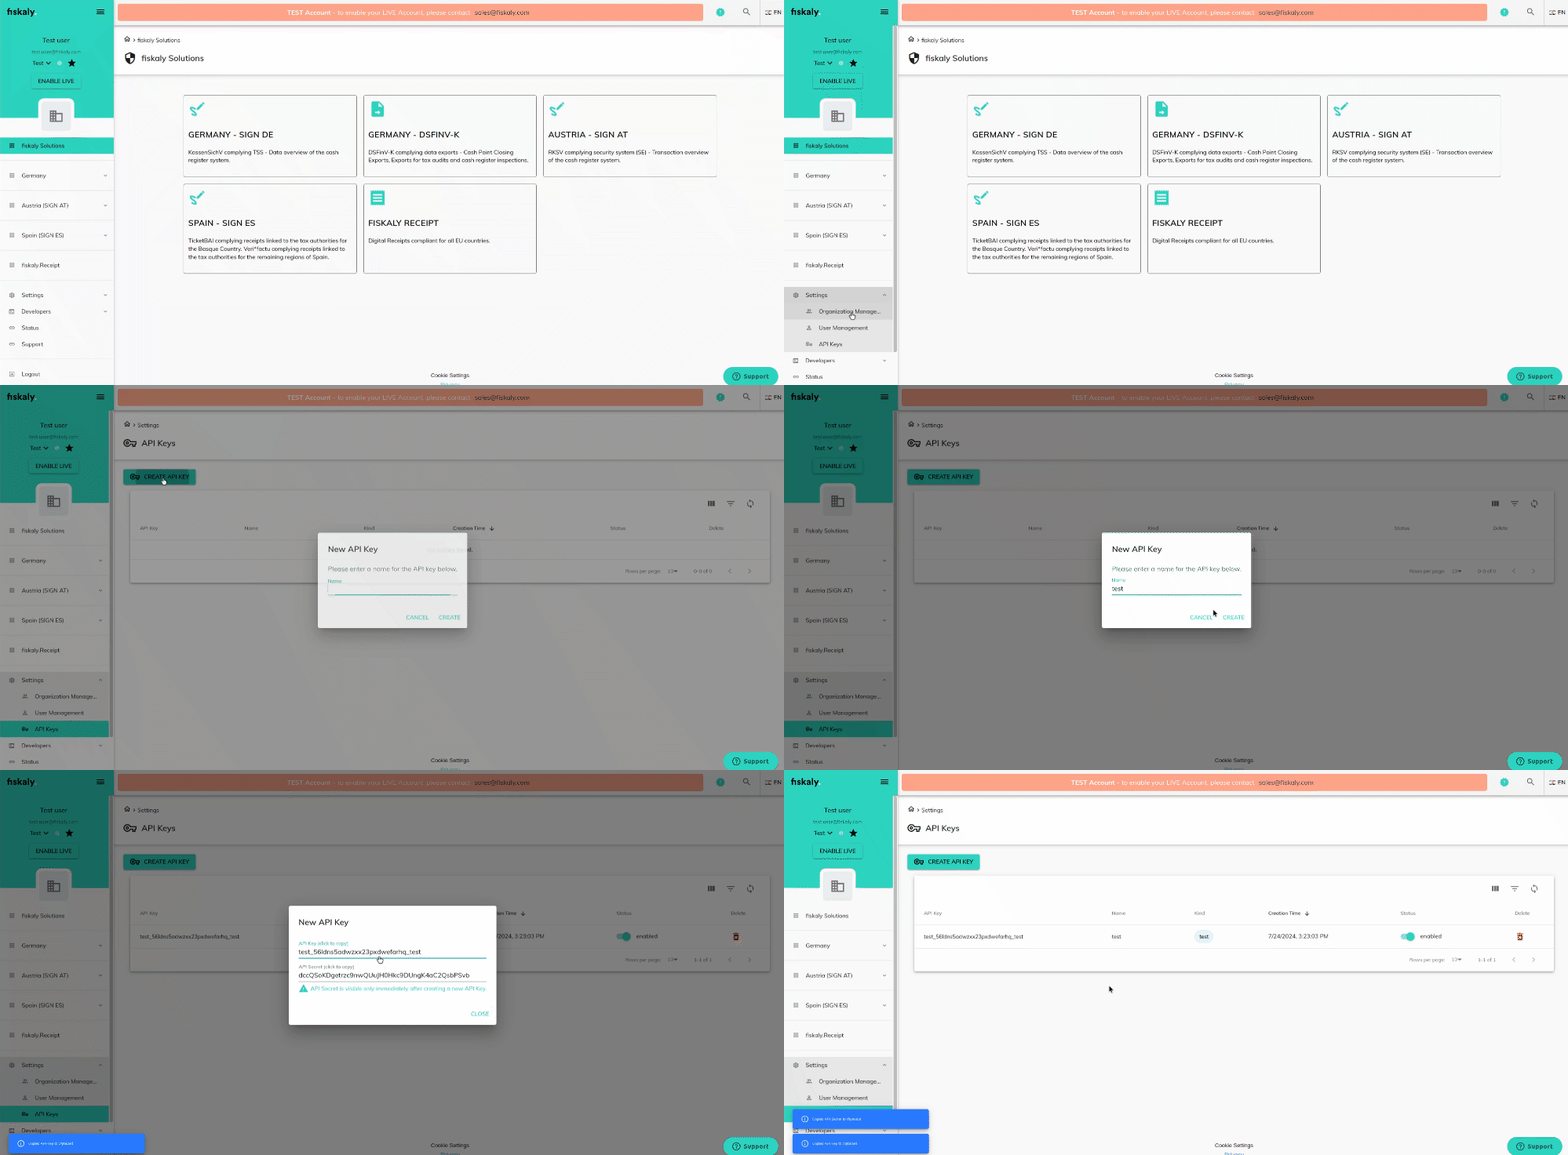
After creating an account and your first organization via the Dashboard, you need to generate an API Key in the Dashboard (Settings → API Keys → CREATE API KEY).

API Key and Secret are required in order to generate an access token via the Management API authenticate endpoint. This token is used for all subsequent API calls.
Creating a managed organization
POST: Create organization
Use this endpoint to create a managed organization. Use the ID of the main organization for the managed_by_organization_id field in your request body.
PATCH: Update organization
Use this endpoint to update information about the organization.
Note: A token generated from a LIVE API Key creates LIVE resources whereas a token generated from a TEST API Key creates TEST resources.
Main Part - SIGN ES
Using SIGN ES API endpoints
Once the organization structure has been created, you can continue step by step using the following SIGN ES API endpoints:
PUT: Create taxpayer information
Use this endpoint to create the taxpayer. The step must be performed only once.
Taxpayer: In SIGN ES, a managed organization represents a taxpayer and its fiscal territory (the legal address of the company). Within each managed organization, a taxpayer must be created. Important: in case of any amendment to the taxpayer data, a new managed organization must be created.
PUT: Create a signer
Use this endpoint to create at least one signer.
Regarding the fields private_key and public_key: this certificate information will be provided by fiskaly.
Signers: In SIGN ES, a signer represents the signing device. At least one signer must be created, but in scenarios with a specifically high volume of invoices, multiple signers may be created. The signer contains a certificate which has to be associated with the taxpayer within the tax authority’s servers. Note: this Device Certificate is provided by fiskaly or, if available, you can also use an existing one.
PUT: Create a client
Use this endpoint to create a client. The client uniquely identifies a terminal, POS device, application or other devices used to issue invoices.
Clients: In SIGN ES, a client represents the POS device. In order to issue invoices you need one client per POS device and at least one signing device.
PUT: Create an invoice
Use this endpoint to create an invoice.
client_id and invoice_id in the path parameters must be defined by you.
Invoices: In SIGN ES, there are three types of invoices: simplified invoice, complete invoice and correcting invoice:
- The simplified invoice only contains information about the issuer, but no information about the recipient of the invoice. This invoice can only be issued up to an amount of € 400 and in some specific cases up to an amount of € 3.000 (retail sales, restaurants, parking services…),
- the complete invoice includes information about both the issuer and the recipient of the invoice, this is the most commonly used type for services provided by professionals or companies,
- the correcting invoice must be issued whenever an error has occurred, such as in case of an incorrect amount. Within this invoice, merchants must choose that it is either a correction by substitution, or a correction by differences.
PATCH: Update an invoice
Use this endpoint to update an invoice This endpoint should only be used in order to cancel an already created invoice.
How to create a digital receipt
After creating an invoice you can create a digital receipt for your invoice using our digital receipt endpoint.The returned URL can easily be shown as a QR code to the consumer at the checkout process and the receipt must no longer be printed. This saves costs, supports the environment, increases customer satisfaction, and adds a new customer touch point for the merchant.
To learn more about the digital receipt beyond its basic functionality, how to improve customer’s loyalty, and take advantage of the fiskaly partner ecosystem, get in touch with us via sales@fiskaly.com. For the visualization of such a digital receipt, take a look at our digital receipt guide and feel free to use our openly available receipt API.
Ready to deep dive?
Have a look at our SIGN ES Quick Start - we created a Postman Collection that allows you to go through the most important functions of this API.